-
[The Core Functionality] Changing the contrast and brightness of an ImageComputer Vision 2020. 7. 25. 23:14
https://docs.opencv.org/master/d3/dc1/tutorial_basic_linear_transform.html
OpenCV: Changing the contrast and brightness of an image!
Prev Tutorial: Adding (blending) two images using OpenCV Next Tutorial: Discrete Fourier Transform Goal In this tutorial you will learn how to: Access pixel values Initialize a matrix with zeros Learn what cv::saturate_cast does and why it is useful Get so
docs.opencv.org
Image Processing
- 일반적인 이미지 처리 연산자는 하나 이상의 입력 이미지를 가져와서 출력 이미지를 생성하는 기능이다.
- 이미지 변환은 다음과 같이 볼 수 있다.
* 포인트 연산자 ( 픽셀 변환 ) , Point Operators
* 이웃( 지역 기반 ) 운영자 , Neighborhoods
Pixel Transform
- 이 종류의 이미지 프로세싱 변환에서, 각각의 출력 픽셀의 값은 대응하는 입력 픽셀 값에만 의존한다.
- 이 연산자의 예로는 색상 보정 및 변환 뿐만 아니라 ㅂ락기 및 대비 조정이 있다.
Brigthness and Contrast Adjustments
- 일반적으로 사용되는 두 점 프로세스는 곱셈, 또는 constant의 addition g(x) = α f(x) + β 이다.
- Parameter α>0 and β 는 종종 gain과 bias parameter이라고 불린다. 또는 contrast와 brightness라고도 한다.
- f(x) 는 source image pixel이고, g(x)는 output image pixels이다.
더 편하게는 이렇게 적는다. g(i,j) = α⋅f(i,jα⋅f(i, j) + β ( i-th row, j-th coloumn )
β = Brightness
β값을 증가(혹은 감소)시킨다면,
β는 각 픽셀에 일정한 값을 더하거나 뺀다.
히스토 그램은 각 색상 수준에 대해 해당 색상 수준의 픽셀 수를 나타낸다. ㅇㅓ두웅 이미지는 낮은 색상값을 가진 많은 픽셀을 가지므로, 히스토그램은 왼쪽부분에 피크를 나타낸다. 일정한 Bias 를 추가하면, 히스토 그램은 오른 쪽으로 이동하게 된다.
α = Contrast
α값은 level이 어떻게 퍼지는지를 수정한다. 만약 α<1 이라면, 색 농도가 압축되고, 그 결과는 적은 대비의 이미지 일 것이다.
Gamma Correction _ 감마 보정
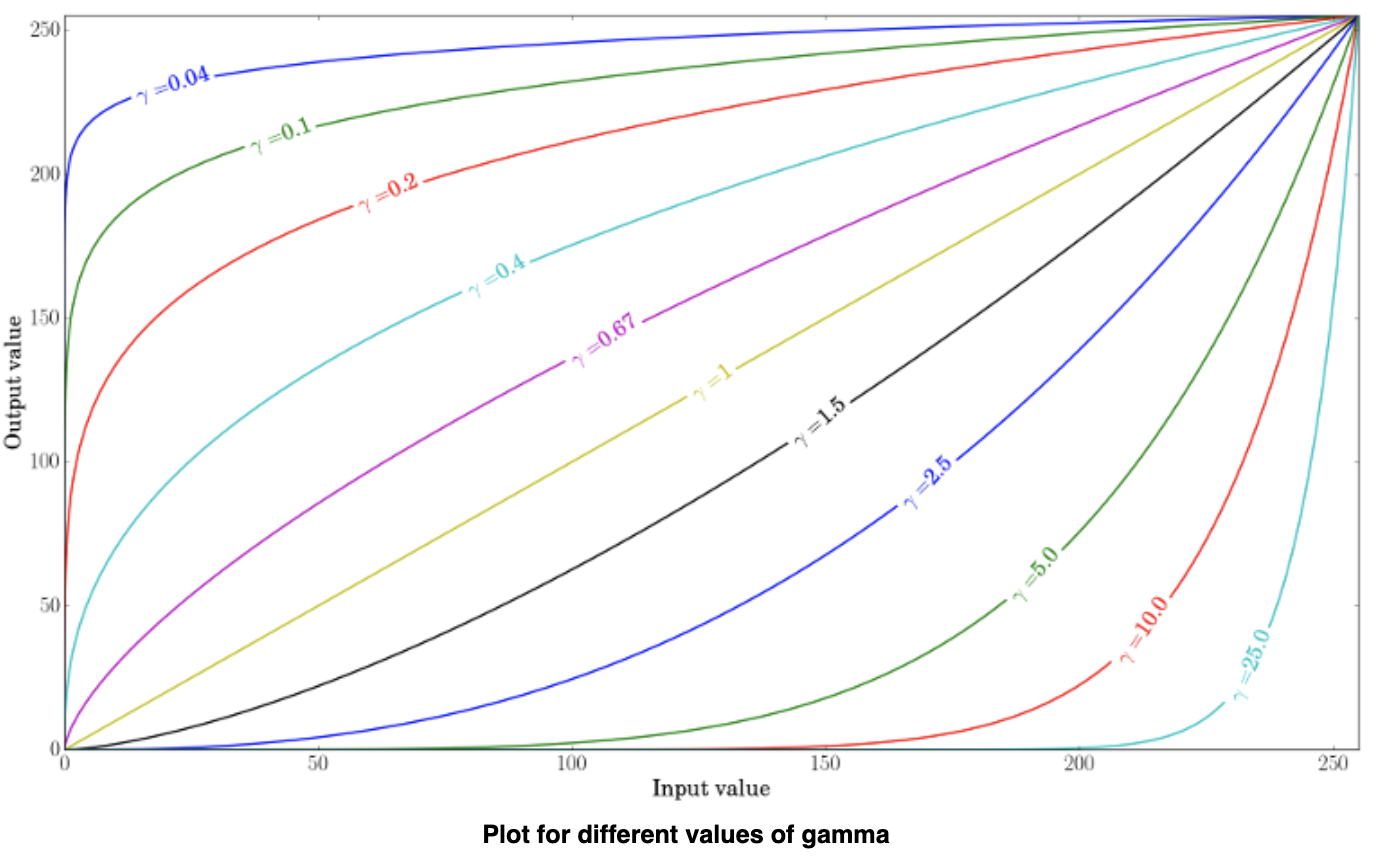
감마 보정은 입력값과 매칭된 출력 값 사이에 비 선형 변환을 사용하여 이미지의 밝기를 보정하는 데 사용할 수 있다.


https://docs.opencv.org/master/d3/dc1/tutorial_basic_linear_transform.html γ<1 이라면,
본래 어두운 영역은 밝게 되고, 그와 대향하는 반면 히스토그램은 오른쪽으로 이동한다.
이미지의 밝기와 대비 조절해 보기
이미지를 변환하기 위해, 새로운 Mat Object가 필요하다.
- Initial pixel values equal to zero
- Same size and type as the original image
Mat new_img = Mat::zeros(img.size(), img.type());cv::Mat::zeros는 Matla-style의 zero initialize 된 행렬을 반환한다.
g(i, j)=α⋅f(i, j)+β와 같이 동작하기 위해, 이미지의 각 픽셀에 접근해야 한다.
이미지는 3개의 채널 B,G,R로 된 컬러 이미지 이기 때문에 3개 픽셀 각각 접근해야 한다. (3중 포문 필요)
    for(int y=0; y<img.rows; y++){
        for(int x = 0; x<img.cols; x++){
            for(int c=0; c<img.channels(); c++){
                new_img.at<Vec3b>(y,x)[c] =
                         saturate_cast<uchar>(alpha*img.at<Vec3b>(y,x)[c] + beta);
            }
        }
    }
각 Pixel에 접근하기 위해서 img.at<Vec3b>(y,x)[c] 구문을 썼다. y = row, x = column, c=B,G,orR 값이다 (0,1,2) 그 후 saturate_cast 함수로 value들이 valid 하게끔 만들어 줘야 한다.
img.converTo(new_img, -1, alpha, beta);위의 3중 포문 대신, 한 줄의 코드로 더 간단하게 구현할 수 있다. cv::mat::converTo 는 *new_img = a*img + beta*처럼 동작한다. 물론 두 구문 모두 같은 동작을 하지만 converTo가 훨씬 빠르다.
#include <iostream>
#include <opencv2/imgcodecs.hpp>
#include <opencv2/highgui/highgui.hpp>
#include <opencv2/imgproc.hpp>

using namespace cv;
// we're NOT "using namespace std;" here, to avoid collisions between the beta variable and std::beta in c++17
using std::cin;
using std::cout;
using std::endl;

int alpha = 10;
int beta = 100;
int gamma_cor = 100;
Mat img_original, img_corrected, img_gamma_corrected;

void basicLinearTransform(const Mat &img, const double alpha_, const int beta_);
void on_linear_transform_alpha_trackbar(int, void *);
void on_linear_transform_beta_trackbar(int, void *);
void gammaCorrection(const Mat &img, const double gamma_);
void on_gamma_correction_trackbar(int, void *);

int main(void) {
    img_original = imread("berlin01.JPG");
    if(img_original.empty()){ cout<<"Error loading image"<<endl; return EXIT_FAILURE; }

    img_corrected = Mat::zeros(img_original.size(), img_original.type());

    imshow("Original Image", img_original);
    namedWindow("Brightness and contrast adjustments");
    namedWindow("Gamma correction");

    createTrackbar("Alpha gain (contrast)", "Brightness and contrast adjustments", &alpha, 30, on_linear_transform_alpha_trackbar);
    createTrackbar("Beta bias (brightness)", "Brightness and contrast adjustments", &beta, 200, on_linear_transform_beta_trackbar);
    createTrackbar("Gamma correction", "Gamma correction", &gamma_cor, 200, on_gamma_correction_trackbar);
    on_linear_transform_alpha_trackbar(0, 0);
    on_gamma_correction_trackbar(0, 0);

    waitKey(0);

    return 0;
}

void basicLinearTransform(const Mat &img, const double alpha_, const int beta_){
    Mat res;
    //Method 1
    //img.convertTo(res, -1, alpha_, beta_);

    //Method 2
    for(int y=0; y<img.rows; y++){
        for(int x = 0; x<img.cols; x++){
            for(int c=0; c<img.channels(); c++){
                img_corrected.at<Vec3b>(y,x)[c] = saturate_cast<uchar>(alpha*img.at<Vec3b>(y,x)[c] + beta);
            }
        }
    }
    imshow("Brightness and contrast adjustments", img_corrected);
}
void on_linear_transform_alpha_trackbar(int, void *){
    double alpha_value = alpha/10.0;
    int beta_value = beta-100;
    basicLinearTransform(img_original, alpha_value, beta_value);
}
void on_linear_transform_beta_trackbar(int, void *){
    double alpha_value = alpha/10.0;
    int beta_value = beta-100;
    basicLinearTransform(img_original, alpha_value, beta_value);
}

void gammaCorrection(const Mat &img, const double gamma_){
    CV_Assert(gamma_>=0);
    Mat lookUpTable(1, 256, CV_8U);
    uchar* p = lookUpTable.ptr();
    for(int i=0; i<256; ++i){
        p[i] = saturate_cast<uchar>(pow(i/255.0, gamma_)*255.0);
    }
    Mat res = img.clone();
    LUT(img, lookUpTable, res);
    imshow("Gamma correction", res);
}

void on_gamma_correction_trackbar(int, void *){
    double gamma_value = gamma_cor/100.0;
    gammaCorrection(img_original, gamma_value);
}
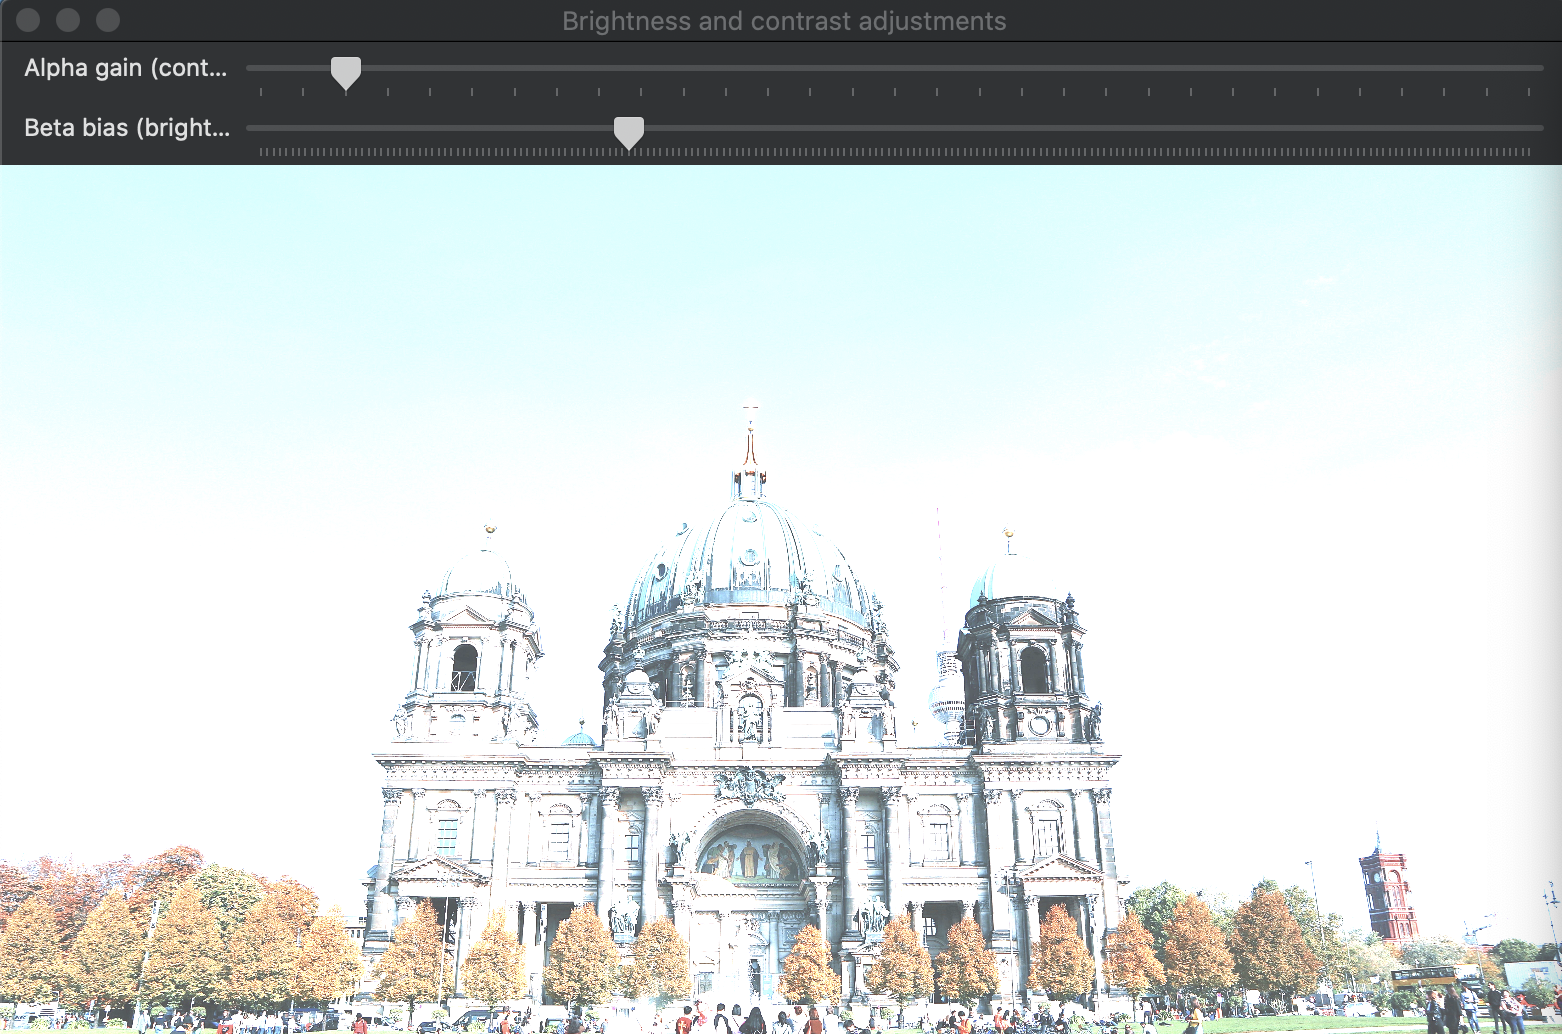
원본 이미지에서 a = 1.2, B = 40 값을 주었을 때,

전체 적인 밝기가 향상 되었다. 하지만 지붕 부분은 색의 영역이 확장 되었음을 볼 수 있다.
원본 이미지에서 γ = 0.4 로 조절.

감마 보정은 매핑이 비 선형이고, 이전 방법에서와 같이 수치 포화가 없기 때문에 채도 효과가 적다.
'Computer Vision' 카테고리의 다른 글
[The Core Functionality] Adding (blending) two images using Open CV (0) 2020.07.25 [The Core Functionality] Operations with Images (0) 2020.07.25 [The Core Functionality] Mask Operations on Matices (0) 2020.07.25 [The Core Functionality] How to scan Images, Lookup tables with Open CV (0) 2020.07.25 [Introduction to OpenCV] Load, Modify, and Save an Image (0) 2020.07.25